Showing posts with label Arts and Crafts. Show all posts
Showing posts with label Arts and Crafts. Show all posts
Thursday, June 10, 2010
My new card blog
I decided to have a dedicate blog for my card design. This one would be straightly for "my state of mind". From now on all the card related post will be here.

Friday, May 28, 2010
Peacock birthday card
When I first saw this HA peacock stamp, I love it. It goes to my shopping list right away.
Due to my sickness, I wasn't very active in making cards these days. But when I saw Vanessa's gorgeous creation, I knew I have to go back to the craft table.
This is my take:

In my mind, peacock is always blue/green! So I took out my broken china and peel paint distress ink right away. I was hoping I have a wide brown ribbon but despite my effort, I can't find a decent matching ribbon. So at the end I use hemp cord instead.
I use various type of distress ink:
peel paint, broken china, tea dye, antique linen for the peacock; tattered rose and spiced marmalade for the flower; shabby shutter and bundled sage for the leaves. Then I distress the edges with walnut stain.
For the larger background, I stamp Old Letter Writing with tattered rose, distress the edge with walnut stain and tea dye. Attached to dark brown card stock and tie up with a hemp cord. Finish off with Basics rhinestones. Sentiment is also HA from the CL139 Birthday Message set.
Card size is 5x7.
Due to my sickness, I wasn't very active in making cards these days. But when I saw Vanessa's gorgeous creation, I knew I have to go back to the craft table.
This is my take:
In my mind, peacock is always blue/green! So I took out my broken china and peel paint distress ink right away. I was hoping I have a wide brown ribbon but despite my effort, I can't find a decent matching ribbon. So at the end I use hemp cord instead.
I use various type of distress ink:
peel paint, broken china, tea dye, antique linen for the peacock; tattered rose and spiced marmalade for the flower; shabby shutter and bundled sage for the leaves. Then I distress the edges with walnut stain.
For the larger background, I stamp Old Letter Writing with tattered rose, distress the edge with walnut stain and tea dye. Attached to dark brown card stock and tie up with a hemp cord. Finish off with Basics rhinestones. Sentiment is also HA from the CL139 Birthday Message set.
Card size is 5x7.
Thursday, May 27, 2010
Baby cards
It's about time. Couple years ago I attend quite a few weddings per year. So it's about time to see more "babies" on board.
I really fell in love this card from Lucy. This is the reason I bought the HA swirly frame and baby set.
So at the end, I come up with this:

Material:
HA Stamps:
S5179 - Swirly Frame
CL265 - Adorable Baby Girl
It also took me a while to find the ink she used: Versamagic Dew Drop Pixie Dust ink
I thought I have similar pink ribbon but I can't find it! So I just pick another one.
Cuttlebug folder: Perfectly Parsley
Silver wire (got from office...shhhhh), and white/pink beads.
Another card that makes use of the swirly frame.
This is also based on Lucy's design.

Isn't this baby stamp cute? My hubby actually pick that one from the craft shop.
Materials:
Stamp:
HA Swirly Frame: S5179
The Cats Pajamas E4159 Sweet Peas
Impression Obsessions C6118 Little One
Paper: DCWD: The Sweets with Glitter package; Provo Craft & Novelty Inc: 42-4435 Pink & orange flowers
Ink: (frame) Crafters Orchid pigment ink, emboss with perfect pearl and clear embossing powder
Sentiment: Memories Black
Others: Ribbon, colour image with copic marker, rangers diamond stickles on the pea
I really fell in love this card from Lucy. This is the reason I bought the HA swirly frame and baby set.
So at the end, I come up with this:
Material:
HA Stamps:
S5179 - Swirly Frame
CL265 - Adorable Baby Girl
It also took me a while to find the ink she used: Versamagic Dew Drop Pixie Dust ink
I thought I have similar pink ribbon but I can't find it! So I just pick another one.
Cuttlebug folder: Perfectly Parsley
Silver wire (got from office...shhhhh), and white/pink beads.
Another card that makes use of the swirly frame.
This is also based on Lucy's design.
Isn't this baby stamp cute? My hubby actually pick that one from the craft shop.
Materials:
Stamp:
HA Swirly Frame: S5179
The Cats Pajamas E4159 Sweet Peas
Impression Obsessions C6118 Little One
Paper: DCWD: The Sweets with Glitter package; Provo Craft & Novelty Inc: 42-4435 Pink & orange flowers
Ink: (frame) Crafters Orchid pigment ink, emboss with perfect pearl and clear embossing powder
Sentiment: Memories Black
Others: Ribbon, colour image with copic marker, rangers diamond stickles on the pea
Tuesday, May 25, 2010
Another Blog Candy
I'm going to try my luck. Who doesn't love chances to win?
This blog candy is offered by Vanessa. Look at her flickr photo gallery, just full of gorgeous cards. A truly talented card maker!
Let's keep my finger crossed.... :)
This blog candy is offered by Vanessa. Look at her flickr photo gallery, just full of gorgeous cards. A truly talented card maker!
Let's keep my finger crossed.... :)
Sunday, May 23, 2010
It's all about cards
All about my recent production.
1. Magnolia.
This is too cute. And this card is my recent favourite.

Material:
Magnolia Tilda
HA Sentiment
Gem stones
K&Company Ribbon(Stitched Felt Ribbon 568808)
Colour with Copic markers
Glossy accent on the lollipop
2. Magnolia again.
This is actually my first design prior to the last one. But for some reason I had hard time to make this "work".

3. Wedding card
Inspired by Suzanne’s card here.

Materials:
HA Starburst Lace S5317
HA Sentiment CL272
Memory Box: Nesting Birds (put flock powder in the middle)
Flower soft (baby pink and bright pink) on the branches
HA pearl heart and other gem stone
The actual card size is a bit small though. (A1)
4. Another wedding card.
This is actually for my friend's order.

Material:
HA CardArt Love Birds KF888
Gem stones
Cuttle bug folder: Textile
Ribbon
5. Birthday card
Inspired from this so I'm trying to recreate it.

Material:
HA Bicycle F5293, sentiment CL272
Great Impressions #A90 (bird)
Flower soft
Small punch for the flower
Copic and glossy accent for the flower
6. Birthday card for my friend using the poppy stamp

I'd like to learn the emboss resist technique with this poppy stamp after seeing all the wonderful entries in the flickr group. Despite my effort, all attempts fail. I don't know why but I can't get crisp result as shown in Tami's card. After 5 trials I give up and try to make this one instead.
Material:
HA poppy cling stamp CG140
Colour with Copic markers
7. Another variation with the poppy stamp
This time I white emboss on top of the distress ink background (shabby shutter).
Then assemble on kraft and brown card stock with green ribbon. Done! Love how the brown and green goes together.

Material:
HA poppy cling stamp CG140
HA sentiments C4715
1. Magnolia.
This is too cute. And this card is my recent favourite.
Material:
Magnolia Tilda
HA Sentiment
Gem stones
K&Company Ribbon(Stitched Felt Ribbon 568808)
Colour with Copic markers
Glossy accent on the lollipop
2. Magnolia again.
This is actually my first design prior to the last one. But for some reason I had hard time to make this "work".
3. Wedding card
Inspired by Suzanne’s card here.
Materials:
HA Starburst Lace S5317
HA Sentiment CL272
Memory Box: Nesting Birds (put flock powder in the middle)
Flower soft (baby pink and bright pink) on the branches
HA pearl heart and other gem stone
The actual card size is a bit small though. (A1)
4. Another wedding card.
This is actually for my friend's order.
Material:
HA CardArt Love Birds KF888
Gem stones
Cuttle bug folder: Textile
Ribbon
5. Birthday card
Inspired from this so I'm trying to recreate it.
Material:
HA Bicycle F5293, sentiment CL272
Great Impressions #A90 (bird)
Flower soft
Small punch for the flower
Copic and glossy accent for the flower
6. Birthday card for my friend using the poppy stamp
I'd like to learn the emboss resist technique with this poppy stamp after seeing all the wonderful entries in the flickr group. Despite my effort, all attempts fail. I don't know why but I can't get crisp result as shown in Tami's card. After 5 trials I give up and try to make this one instead.
Material:
HA poppy cling stamp CG140
Colour with Copic markers
7. Another variation with the poppy stamp
This time I white emboss on top of the distress ink background (shabby shutter).
Then assemble on kraft and brown card stock with green ribbon. Done! Love how the brown and green goes together.
Material:
HA poppy cling stamp CG140
HA sentiments C4715
Friday, April 23, 2010
My first Tilda card
Ever since I have seen card with Magnolia stamp, I almost fall in love with Tilda in the first sight. It's just SO CUTE! And often, those cards are having wonderful design and layout, not to mention wonderful copic colouring, which I always dream that I could have done that in one day.
As I found the Magnolia stamp by accident in the US craft store, I am about to practise that with my copic. And of course, it's time for making Mothers' Day Card as well.
So, here it is.

Material:
Magnolia stamp.
HA sentiment
MS heart border punch
Spellbinders fancy label
Ribbon
Prima flower and button.
Copic markers
I know my skill is not there yet for any "challenges". But it doesn't hurt to try right? This is the first Magnolia challenge I sign up for: Just Magnolia, Week 52 challenge - Anything goes.
As I found the Magnolia stamp by accident in the US craft store, I am about to practise that with my copic. And of course, it's time for making Mothers' Day Card as well.
So, here it is.
Material:
Magnolia stamp.
HA sentiment
MS heart border punch
Spellbinders fancy label
Ribbon
Prima flower and button.
Copic markers
I know my skill is not there yet for any "challenges". But it doesn't hurt to try right? This is the first Magnolia challenge I sign up for: Just Magnolia, Week 52 challenge - Anything goes.
Monday, April 12, 2010
Thank you card
I don't usually make thank you card. This is my first trial. Also first time to use the grass stamp.

Material used:
HA Silhouette Grass S5316
HA All Occasion CL272
Rangers distress ink: tea dye, shabby shutter, perfect pearls (put in mini mister).
Prima flower and metal brads
Spellbinders: Label 8
MS butterfly punch
Material used:
HA Silhouette Grass S5316
HA All Occasion CL272
Rangers distress ink: tea dye, shabby shutter, perfect pearls (put in mini mister).
Prima flower and metal brads
Spellbinders: Label 8
MS butterfly punch
Thursday, March 25, 2010
Birthday cards
Two birthday cards to share.
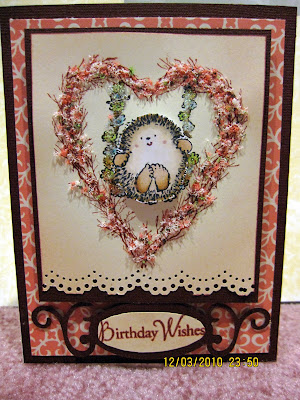
I hope this is not too girly. Because this one is actually for my hubby's birthday.
Material includes:
HA Birthday Messages CL139
Penny Black: 30-021 Garden friends
Memory Box: Branch Heart E1310
Spellbinders: fancy label
Flower soft: Sweet pea
Rangers: Diamond Stickles
Rangers: Distress ink: tattered rose
Copic markers
MS border punch
This is a quick one for my friend.

Material includes:
Impression Obsession's CL156 Smell the coffee
HA CL139 Birthday Messages
MS border punch
I hope this is not too girly. Because this one is actually for my hubby's birthday.
Material includes:
HA Birthday Messages CL139
Penny Black: 30-021 Garden friends
Memory Box: Branch Heart E1310
Spellbinders: fancy label
Flower soft: Sweet pea
Rangers: Diamond Stickles
Rangers: Distress ink: tattered rose
Copic markers
MS border punch
This is a quick one for my friend.
Material includes:
Impression Obsession's CL156 Smell the coffee
HA CL139 Birthday Messages
MS border punch
Monday, February 22, 2010
Happy Chinese New Year

It's been a while since my last post. As you may know, it's the time for my annual trip to Asia.
I haven't really done a lot of shopping this time. A large portion of my expense is on food. I think overall, I spent the least as compare to previous trips.
Wednesday, January 27, 2010
Wedding card
A friend of mine is getting married this weekend. Although I'm not able to attend in person (the wedding is out of town), I will send a gift as my token of celebrating their big day. So, first thing I need is a card.
Since my friend is the groom, I try not to use those girly colour (such as pink) as the main colour.

This is the first time I use flock powder on my card, and also first time to use flower soft. Love the effect.
Material:
Stamp: Memory Box-Nesting birds D1315
HA CL272 (sentiment)
Frame: bo bonny paper and Nestabilities Label Four
Making Memories crystal brads
Ribbon
Flower soft (heather) and diamond stickles (the stickles doesn't show in the picture)
Flock powder on the birds
Love the design of this one (although not my original design). The way it opens just like an invitation.


Materials:
Memory Box stamp and paper.
Since my friend is the groom, I try not to use those girly colour (such as pink) as the main colour.
This is the first time I use flock powder on my card, and also first time to use flower soft. Love the effect.
Material:
Stamp: Memory Box-Nesting birds D1315
HA CL272 (sentiment)
Frame: bo bonny paper and Nestabilities Label Four
Making Memories crystal brads
Ribbon
Flower soft (heather) and diamond stickles (the stickles doesn't show in the picture)
Flock powder on the birds
Love the design of this one (although not my original design). The way it opens just like an invitation.
Materials:
Memory Box stamp and paper.
Saturday, January 16, 2010
Another yummy blog candy...
This is another eye catching yummy blog candy...

given by a very talented card maker, Kathy.
Details of the giveaway is here.
And look at her photostream...full of fabulous works!
Thanks to Kathy for her generosity, and to her continuous great inspiration she shares with others in card making!
given by a very talented card maker, Kathy.
Details of the giveaway is here.
And look at her photostream...full of fabulous works!
Thanks to Kathy for her generosity, and to her continuous great inspiration she shares with others in card making!
Thursday, January 14, 2010
My first copic attempt

Ever since I bought my first copic marker, I was hoping that I can draw like those Japanese manga style anime. They are just so cute. And gradually, my copic marker collection grew bigger.
Yet, they seem too difficult to use: I don't have the proper image to try on, I don't have the proper paper, and the colour seems never blends in. And my copic markers are just sitting in the corner of my room collecting dust.
Luckily, the new HA stamp collection includes this little cute girl stamp, perfect for me to practice using my copic markers. I have gone through a few online blog and video tutorial. Although I was never able to get the same set of maker, I still decided to give it a try. So, the top left figure is my first trial. And I'm perfectly happy with how her hair turns out. Perhaps I am just too happy, I didn't pay enough attention to the face colouring. No matter how I did, her face is still patchy and uneven. After watching a few more online tutorial about face colouring, I finally figure out that I should have E000 (which I don't have and not able to find within my area). I just have to use lighter colour on the next one. So the "face" of the other figures turn out a bit better.
However, since I put too much effort on the hair, I got too exhausted to do colour matching for her dresses. I knew they will look better with lake-blue colour dresses, but I'm too lazy to find out the right colour combo. Finally, the last attempt for black/gray hair failed. I don't have the right marker set for blending so that's how bad it turns out.
Note, the maker number I wrote down is the one I used for the hair only. And I use memento black ink, as recommended by other copic users. Since this is only my first trial, I'm using regular card stock (which bleeding occurs). Next time I'll try with proper card stock (specifically for marker) and hopefully no more bleeding.
Saturday, January 9, 2010
New attempt in card making
Since I only made limited number of x'mas card last year, they mostly went to my relatives. Still, I feel like missing something that I didn't give any card to my friends. But it doesn't seem to make sense to give out x'mas or even new year card as it's almost mid January! So I try to incorporate some practical use in the card. Then I come up the idea of making a "calendar" card with Friendship theme. i.e. a card that can be used as a mini calender. So I hope that people can use it all year round.
#1

Materials:
First print out calendar from excel spreadsheet.
Stamp:
S5215 Clouds (the sky background)
Penny Black 30-029 Wonderful (the flower stamp)
Ink:
HA Soft pool shadow ink
Others:
Rangers diamond stickles on the flower.
Felt flower cloth pin
Bunny cloth pin
Bubbles and blink sticker
Acetate as the pocket to hold the pages
Cuttle bug with Spellbinders label one die to cut out the frame.
This is the inside:

#2
This one is inspired from the Paper Creation (Fall 09) magazine. One time I saw this set of stamp in the local stamp store. I struggled a bit but I finally decided to buy it. I want to make a card for my friend who LOVE coffee.

Materials:
Stamp:
Impression Obsession's CL156 Smell the coffee
Ink:
Rangers Tattered Rose distress ink
colour with water cololur pencil
Others:
Metallic brads
Cuttlebug folder Swiss dots (on the brown frame)
Ribbon
(does it look like a cafe setting?)
Both of these cards took really long time (a few hours for each of them), including some failure attempts. But if I sent this "coffee" calendar to my friend then what about the other two friends who I will meet at the same time? So ... I forced myself to into "CRUNCH MODE"... and call me crazy, I went back home during lunch hour. In 2.5 hours, I finished these two:
#3
Since I want to finish it quick I use my new purchase: the Dandelion Frame cling stamp. Add the same sentiment as the last card, then attach the calendar. Done!

Materials:
Stamp:
HA Dandelion Frame CG153
Sentiment is from HA CL182
Ink:
Memories Chocolate brown
Others:
Ribbon and metallic brads
I have added some gem stones later on but forgot to take picture...
#4
I have wanted to made a card for my friend since she got pregnant 4 months ago. But since I was too busy (yeah, what else) and she was out of town during x'mas time as well, I put off the card making till now.

Materials:
Stamp:
HeroArts CL256 adorable Baby Girl set
penny black stickers (the bee and the bug)
Sentiment: Studio G
Others:
felt flower cloth pin, crystal brads.
I want this cheerful cartoon setting and without the info of the sex of the baby, I have to make it "neutral" colour scheme. Hope she likes it!
#1
Materials:
First print out calendar from excel spreadsheet.
Stamp:
S5215 Clouds (the sky background)
Penny Black 30-029 Wonderful (the flower stamp)
Ink:
HA Soft pool shadow ink
Others:
Rangers diamond stickles on the flower.
Felt flower cloth pin
Bunny cloth pin
Bubbles and blink sticker
Acetate as the pocket to hold the pages
Cuttle bug with Spellbinders label one die to cut out the frame.
This is the inside:
#2
This one is inspired from the Paper Creation (Fall 09) magazine. One time I saw this set of stamp in the local stamp store. I struggled a bit but I finally decided to buy it. I want to make a card for my friend who LOVE coffee.
Materials:
Stamp:
Impression Obsession's CL156 Smell the coffee
Ink:
Rangers Tattered Rose distress ink
colour with water cololur pencil
Others:
Metallic brads
Cuttlebug folder Swiss dots (on the brown frame)
Ribbon
(does it look like a cafe setting?)
Both of these cards took really long time (a few hours for each of them), including some failure attempts. But if I sent this "coffee" calendar to my friend then what about the other two friends who I will meet at the same time? So ... I forced myself to into "CRUNCH MODE"... and call me crazy, I went back home during lunch hour. In 2.5 hours, I finished these two:
#3
Since I want to finish it quick I use my new purchase: the Dandelion Frame cling stamp. Add the same sentiment as the last card, then attach the calendar. Done!
Materials:
Stamp:
HA Dandelion Frame CG153
Sentiment is from HA CL182
Ink:
Memories Chocolate brown
Others:
Ribbon and metallic brads
I have added some gem stones later on but forgot to take picture...
#4
I have wanted to made a card for my friend since she got pregnant 4 months ago. But since I was too busy (yeah, what else) and she was out of town during x'mas time as well, I put off the card making till now.
Materials:
Stamp:
HeroArts CL256 adorable Baby Girl set
penny black stickers (the bee and the bug)
Sentiment: Studio G
Others:
felt flower cloth pin, crystal brads.
I want this cheerful cartoon setting and without the info of the sex of the baby, I have to make it "neutral" colour scheme. Hope she likes it!
Wednesday, December 23, 2009
X'mas card 09
OK, I do admit that I'm a "last minute type" of person, especially anything requires creativity.
But everything comes with a price. Mailing to US in express (hoping to arrive before X'mas) costs me $13.5 each.

This one in fact took me the longest. I was debating to use blue or light cream colour in the bottom half.
Material: Penny Black sticker (the snowman) - Joyous Season #10-187, ribbon, and Cuttlebug folder (Snowflakes).
This is my inspiration picture. Really love her work. Here's her photostream.

The other one from my snowman series:

Material:
The little bear stamp in the middle is by Elzybells Art Stamps.
It's actually made in Canada! Woo hoo!
The sentiment is Denami Design., Ribbon is from my lucky draw prize from Pia.
Gemstone is from Michaels.
My inspiration:

These other ones are also using Penny Black stickers and Cuttlebug embossing folder. (Snowflakes, With Love-the flower one)
I also put double sided tape and sprinkle fine glitter powder on top (except the last one). Too bad the camera didn't capture the shining glitter.


But everything comes with a price. Mailing to US in express (hoping to arrive before X'mas) costs me $13.5 each.
This one in fact took me the longest. I was debating to use blue or light cream colour in the bottom half.
Material: Penny Black sticker (the snowman) - Joyous Season #10-187, ribbon, and Cuttlebug folder (Snowflakes).
This is my inspiration picture. Really love her work. Here's her photostream.
The other one from my snowman series:
Material:
The little bear stamp in the middle is by Elzybells Art Stamps.
It's actually made in Canada! Woo hoo!
The sentiment is Denami Design., Ribbon is from my lucky draw prize from Pia.
Gemstone is from Michaels.
My inspiration:
These other ones are also using Penny Black stickers and Cuttlebug embossing folder. (Snowflakes, With Love-the flower one)
I also put double sided tape and sprinkle fine glitter powder on top (except the last one). Too bad the camera didn't capture the shining glitter.
Saturday, December 5, 2009
First Christmas card of the year
I planned to make a birthday card for my birthday twin. Instead, I am too tempting to make a Christmas card.
So here it is:

Using two different cuttle bug folders: tiny bubble and snowflakes. The glitter at the background doesn't show too well. The snowman is a sticker. The border is dark blue but it shows like black in the picture.
Here's the inside.
The Rangers distress ink (faded jeans) does not give a very crisp image. But I like the colour.

In the end, I got no time for the birthday card. But lucky, I have an extra card from before. The orange butterfly one. Glad that it goes to my birthday twin!
So here it is:
Using two different cuttle bug folders: tiny bubble and snowflakes. The glitter at the background doesn't show too well. The snowman is a sticker. The border is dark blue but it shows like black in the picture.
Here's the inside.
The Rangers distress ink (faded jeans) does not give a very crisp image. But I like the colour.
In the end, I got no time for the birthday card. But lucky, I have an extra card from before. The orange butterfly one. Glad that it goes to my birthday twin!
Wednesday, December 2, 2009
Another giveaway, am I lucky this time?

Not only love the stamping supply prizes, but most important of all, I WANT JENN'S CARD!!! She's one of my favourite card makers from the HA Flickr Group. Take a look at her artwork here and her blog. Very nice colour combo and superb design.
Now I'm keeping my finger crossed!
Thank you for your generosity of the giveaway, Jenn.
Saturday, November 28, 2009
Masculine Birthday Card and Jennifer McGuire's Thinking Ink Class
My attempt for a masculine birthday card.
It's about the time to try out my new purchase: perfect pearl and the Three Fern Stamp.
This picture shows a bit better how shiny it is with the perfect pearl:

Material Includes:
Stamps: S5154 Three Ferns, C4715 Happy Birthday
Perfect Pearl: gold colour
Paper stock: Water colour paper, My Mind Eyes Natural-Strength; Item #LL1150 (also shiny)
Brown dotted ribbon
Metal brads
Cuttlebug folder: Just my type
The personalized stamp I ordered about a month ago finally arrived in my post box. Just in time to use it on the back of my card. I didn't get a picture though.
This time I'm using the stamping technique I learn the technique from Jennifer McGuire's thinking ink class (Week 8).
I really like her tutorial, she gave very useful tip and presented very nice and clearly.
If you are interested, here's the link of her Thinking Ink classes:
Week 1:
Distress Ink Part 1
Distress Ink Part 2
Distress Ink Part 3
Week 2:
Embossing Powder
Multi-powder Embossing
Distress Embossing Powders
Week 3:
Paint Dabbers - Backgrounds
Paint Dabbers - Stamp with paint
Paint Dabbers - Resist
Week 4
Distress Crackle Paint
Distress Crackle Paint and Stamping
Distress Crackle Paint - Adding shine
Week 5
Alcohol Ink - Creating background
Alcohol Ink - Clear embellishments
Alcohol Ink - Using embellishments
Week 6
Dimensional Pearl and Stickles - the Basics
Dimensional Pearl and Stickles - Stamping
Dimensional Pearl and Stickles - Creating backgrounds
Week 7
Canvas & Stamping Part 1
Canvas & Stamping Part 2
Canvas & Stamping - More ideas
Week 8
Perfect Pearls Part 1
Perfect Pearls Part 2
Perfect Pearls - Additional techniques
Week 9
Distress Ink
Alcohol Ink
Everything!
It's about the time to try out my new purchase: perfect pearl and the Three Fern Stamp.
 |
| From My creations |
This picture shows a bit better how shiny it is with the perfect pearl:
Material Includes:
Stamps: S5154 Three Ferns, C4715 Happy Birthday
Perfect Pearl: gold colour
Paper stock: Water colour paper, My Mind Eyes Natural-Strength; Item #LL1150 (also shiny)
Brown dotted ribbon
Metal brads
Cuttlebug folder: Just my type
The personalized stamp I ordered about a month ago finally arrived in my post box. Just in time to use it on the back of my card. I didn't get a picture though.
This time I'm using the stamping technique I learn the technique from Jennifer McGuire's thinking ink class (Week 8).
I really like her tutorial, she gave very useful tip and presented very nice and clearly.
If you are interested, here's the link of her Thinking Ink classes:
Week 1:
Distress Ink Part 1
Distress Ink Part 2
Distress Ink Part 3
Week 2:
Embossing Powder
Multi-powder Embossing
Distress Embossing Powders
Week 3:
Paint Dabbers - Backgrounds
Paint Dabbers - Stamp with paint
Paint Dabbers - Resist
Week 4
Distress Crackle Paint
Distress Crackle Paint and Stamping
Distress Crackle Paint - Adding shine
Week 5
Alcohol Ink - Creating background
Alcohol Ink - Clear embellishments
Alcohol Ink - Using embellishments
Week 6
Dimensional Pearl and Stickles - the Basics
Dimensional Pearl and Stickles - Stamping
Dimensional Pearl and Stickles - Creating backgrounds
Week 7
Canvas & Stamping Part 1
Canvas & Stamping Part 2
Canvas & Stamping - More ideas
Week 8
Perfect Pearls Part 1
Perfect Pearls Part 2
Perfect Pearls - Additional techniques
Week 9
Distress Ink
Alcohol Ink
Everything!
Monday, November 2, 2009
Disappointed
Woke up early morning to drive to Point Roberts to pick up my online purchase. First time to purchase online and ship there, to take advantage of the free shipping within US. I only paid $2.5 for storage fee. Point Roberts is actually not as close as I thought. It seems to take longer to get there than to the Pacific Crossing border.
At night, I was about to finish my first acetate card. Only when I heat emboss the front, the heat crook the acetate...I was so upset because I have put lots of time in the design and yet the whole thing is in vain now.
Lesson learnt: do NOT heat emboss anything on or even close to the acetate card.
Tuesday, October 27, 2009
Birthday card to Mom
I haven't started any of the x'mas card yet, since I have a more urgent task: Mom's birthday is coming up in two weeks.
Mom always prefer cute design and I decided not to use too complicated technique. This is a cheerful scene, I wish my Mom feel this way as she sees the card.

Inspired from this one:
Used a variety of different stamps (all Hero arts):
LP161 Asian Kids
CL153 Clear Design Happy Day Animals
CL230 Clear Design Live simple
CL138 Bird Branch
CL139 Birthday messages
Rangers Diamond Stickles
Copic markers, colour pencil.
I still found the distress ink and applicator not as easy to use. My first attempt for the blue background fails. Often I got big intense spot of ink on the paper. Maybe I need more practice...but it seems so easy on the tutorial video...
Mom always prefer cute design and I decided not to use too complicated technique. This is a cheerful scene, I wish my Mom feel this way as she sees the card.
Inspired from this one:
Used a variety of different stamps (all Hero arts):
LP161 Asian Kids
CL153 Clear Design Happy Day Animals
CL230 Clear Design Live simple
CL138 Bird Branch
CL139 Birthday messages
Rangers Diamond Stickles
Copic markers, colour pencil.
I still found the distress ink and applicator not as easy to use. My first attempt for the blue background fails. Often I got big intense spot of ink on the paper. Maybe I need more practice...but it seems so easy on the tutorial video...
Thursday, October 22, 2009
雪中送炭
昨天的我真的很失落,就好像是走到谷底一樣。
沒想到上天還待我不薄。事緣我從去年起對製作手工卡片產生了濃厚興趣,也加入了網路上的社群。其間一些製造商,時常主辦比賽,勝出者就能獲得一些手工藝材料。我也參加過好幾次,當然名落孫山。除此之外,也有每星期抽獎,一年下來,由當初的熱切期待每次公佈的日子,到現在差不多到了愛理不理的程度,因為我學懂了沒有期望,才沒有失望。除了由製造商舉辦的抽獎外,也有個別成員舉辦抽獎,送出小禮物。只要在他的部落或上載的圖片上留言,就有機會參加,而我就抱著一試無妨的心態,也參加過幾次。沒想到,這一次中了,早上就收到電郵說我被抽中了。這些就是我的獎品。
太好了,都是我很喜愛,卻又捨不得買的rubber stamp呢!而這個就是我得獎的公佈。
再一次謝謝 Pia 的慷慨,同時也謝過替我高興的成員。一份小禮物,一句留言,卻是如此的窩心。
感謝了。
Subscribe to:
Posts (Atom)